
Step by Step on how to install a new asphalt roof.
Table of content:
Old roof removal
Plywood sheeting
Roofing underlayment
Starter row
Metal valley
Installing shingle
Installing roof vents
Installing wall step flashing
Ridge cap
In this article we will give a step by step on installing a new roof. Roofing is physical strenuous project. We do not recommend you try it your self.
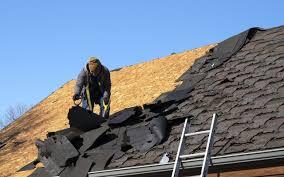 Removing the Old Roof:
The first step of the installation process is to remove the old roof. It is essential to remove the old shingles, under lament, and flashing material to install the new roof correctly. You will need to use a hammer, a roofing shovel, and a dumpster to remove the old roof.
 Plywood Sheeting Inspection:
Once the old roof is removed, it is essential to inspect the plywood sheeting to ensure that it is in good condition. If there is any damage, it should be replaced before installing the new roof.
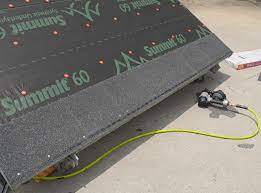
 Roofing Underlayment:
After inspecting the plywood sheeting, the next step is to install the underlayment. Underlayment is a layer of waterproof material that is installed over the plywood sheeting to prevent water from seeping into the house. The underlayment is usually made of felt or synthetic material, and it is attached to the roof with nails or staples.
 Starter Row of Roofing:
The starter row is the first row of shingles that are installed at the bottom of the roof. The starter row provides a solid base for the rest of the shingles to be installed on. To install the starter row, you will need to cut the shingles in half and nail them to the roof with the adhesive strip facing up.
 Installing Metal Valley:
The metal valley is a piece of metal that is installed in the valleys of the roof. The valley is the area where two roof sections meet, and it is the most vulnerable area of the roof. The metal valley is installed to protect the roof from water damage. To install the metal valley, you will need to cut it to size and nail it to the roof.
Installing a roof valley with asphalt shingles is an important part of roofing installation. A roof valley is the V-shaped area where two roof planes intersect and is designed to direct water off the roof. Proper installation of the valley is essential to ensure that your roof remains leak-free and in good condition for many years to come. Here's a step-by-step guide on how to install a roof valley with asphalt shingles:
- Start by removing any existing roofing material in the valley. This includes old shingles, felt paper, and other debris. Make sure the area is clean and free of any debris.
- Install a layer of ice and water shield in the valley. This will act as a waterproof barrier and protect against any leaks. Cut the ice and water shield to fit the length of the valley and peel off the backing to expose the adhesive side.
- Carefully lay the ice and water shield down the valley, making sure it is centered and smooth. Use a roller to press the shield down and remove any air bubbles.
- Install the metal valley flashing. Cut a piece of metal flashing to the length of the valley and bend it in half lengthwise to form a V-shape. Place the metal flashing over the ice and water shield and secure it to the roof deck with roofing nails. Make sure the metal flashing is flush with the roof deck. Install the first row of shingles on one side of the valley.
- Cut the shingles so that they are flush with the valley flashing. Make sure the shingles are aligned and spaced evenly. Nail the shingles in place, making sure the nails are flush with the surface of the shingle.
- Install the second row of shingles on the other side of the valley. Cut the shingles so that they overlap the first row of shingles by at least six inches. Again, make sure the shingles are aligned and spaced evenly. Nail the shingles in place, making sure the nails are flush with the surface of the shingle.
- Install the final row of shingles in the valley. Cut the shingles so that they are flush with the valley flashing. Make sure the shingles are aligned and spaced evenly. Nail the shingles in place, making sure the nails are flush with the surface of the shingle.
- Seal the edges of the shingles with roofing cement. Apply a thin layer of roofing cement along the edges of the shingles and press them down firmly. This will help to create a waterproof seal and prevent any leaks.
Installing a roof valley with asphalt shingles requires careful attention to detail and a steady hand. By following these steps, you can ensure that your roof valley is installed correctly and will provide many years of reliable service.
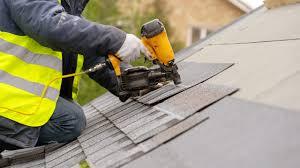 Roofing Shingle Installation:
After installing the starter row and metal valley, you can start installing the shingles. Shingles are installed from the bottom up, starting from the eaves of the roof. The shingles are nailed to the roof with roofing nails, and the adhesive strip is activated by the sun's heat to create a strong bond.
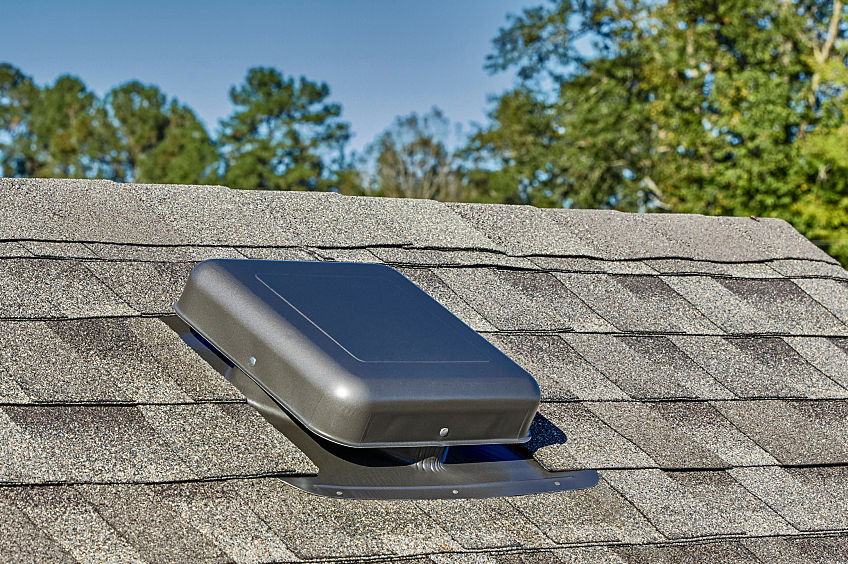 Installing Roof Vents
As you advance up the roof with shingles you will need to start installing roof vents.
Installing roof vents is a crucial step in ensuring proper ventilation in your home. A roof vent is an opening in the roof designed to allow air to circulate freely through the attic space. This helps prevent moisture buildup, mold growth, and other problems that can damage your roof and compromise your indoor air quality. In this article, we will guide you through the steps involved in installing roof vents.
Step 1: Choose the Right Ventilation System The first step in installing roof vents is to select the right ventilation system for your needs. There are different types of vents available, such as ridge vents, gable vents, and soffit vents. The type of vent you choose will depend on the type of roof you have, the size of your attic space, and your ventilation needs. For example, if you have a pitched roof, a ridge vent is an ideal option. A gable vent is better suited for a gable roof, while a soffit vent is ideal for a flat roof. The key is to select a ventilation system that will provide adequate airflow without compromising the integrity of your roof.
Step 2: Measure and Mark the Ventilation Area Once you have chosen the ventilation system, the next step is to measure and mark the area where the vents will be installed. This is typically done on the roof's surface, where the vents will be placed. Using a measuring tape, measure the length and width of the vent. Mark the location on the roof with a chalk line or a pencil. Make sure to mark the vent's centerline accurately to ensure proper alignment with the ventilation system.
Step 3: Cut the Hole for the Vent The next step is to cut the hole for the vent. Use a reciprocating saw or circular saw to cut along the marked lines. Be sure to follow the manufacturer's instructions for cutting the hole, as they may vary depending on the type of vent. Take care when cutting the hole to avoid damaging the roof's underlying structure, such as rafters and joists.
Step 4: Install the Vent Once the hole has been cut, it's time to install the vent. The exact installation method will depend on the type of vent you are installing. For a ridge vent, simply place the vent over the cut hole and secure it with roofing nails or screws. For a gable or soffit vent, you may need to install a frame to support the vent.
Step 5: Seal and Insulate After the vent has been installed, it's important to seal and insulate around the edges to prevent air leakage. Use a waterproof sealant or roofing cement to seal the edges of the vent. You should also insulate the area around the vent to prevent heat loss or gain. Use insulation batting or foam insulation to fill the gaps around the vent.
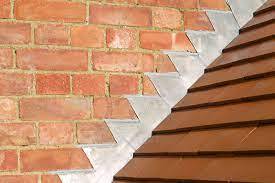 Wall Step Flashing:
Wall step flashing is an important component of any roofing system that is installed next to a vertical wall. The flashing helps to prevent water from seeping into the building through the gap between the roof and the wall. Without proper flashing, water can easily penetrate the roof and cause damage to the interior of the building. In this article, we will provide a step-by-step guide on how to install wall step flashing on a roof.
Step 1: Choose the Right Flashing Material The first step in installing wall step flashing is to select the right material for the job. Flashing is typically made of galvanized steel, aluminum, or copper. Copper is the most durable and long-lasting option, but it is also the most expensive. Galvanized steel and aluminum are more affordable options and offer good protection against water damage.
Step 2: Measure and Cut the Flashing Measure the length of the wall where the flashing will be installed. Cut the flashing material into strips that are about 8 inches wide and long enough to cover the entire length of the wall. If necessary, you can use a metal cutter or snips to cut the flashing to size.
Step 3: Install the Starter Strip The starter strip is the first piece of flashing that is installed on the roof. It is installed at the bottom of the roof, under the shingles, and extends up the wall. The starter strip should be installed directly on top of the roofing underlayment, which provides an additional layer of protection against water damage.
Step 4: Install the Wall Step Flashing Begin installing the wall step flashing at the corner of the roof where the wall and roof meet. Insert the flashing under the shingle and overlap the starter strip. Make sure that the flashing is properly aligned with the wall and that it extends up the wall at least 8 inches. Nail the flashing into place using roofing nails, making sure that the nails are flush with the flashing surface. Repeat this process for the remaining flashing strips, overlapping each piece by about 2 inches.
Step 5: Install the Counter Flashing The counter flashing is installed on top of the wall step flashing to provide additional protection against water intrusion. Cut the counter flashing to size and slide it under the shingles. Nail it in place, making sure that the nails are flush with the surface of the flashing.
Step 6: Seal the Flashing To ensure that the flashing is properly sealed, apply roofing cement or sealant along the top and sides of the flashing. This will help to prevent water from seeping into the gap between the flashing and the wall.
Step 7: Inspect and Maintain the Flashing After the flashing has been installed, inspect it regularly to ensure that it is still in good condition. Check for any signs of damage, such as cracks or rust, and repair or replace any damaged flashing as soon as possible. Additionally, keep the area around the flashing clear of debris, such as leaves and branches, to prevent blockages that could impede water flow.
In conclusion, installing wall step flashing is an important part of any roofing system that is installed next to a vertical wall. By following the steps outlined in this article, you can ensure that your flashing is properly installed and provides the protection your roof needs against water damage. If you are unsure about any part of the installation process, it is always best to seek the advice of a professional roofing contractor.
 Ridge Cap:
The ridge cap is the last piece of the roofing puzzle. It is installed at the peak of the roof to protect the roof from water damage. To install the ridge cap, you will need to cut the shingles to size and nail them to the roof. The ridge cap is installed over a layer of adhesive to create a strong bond.
In conclusion, installing a roofing shingle is a detailed process that requires attention to detail and a lot of hard work. Removing the old roof, inspecting the plywood sheeting, installing the underlayment, starter row, metal valley, shingle installation, and ridge cap are all crucial steps in the process. By following these steps, you can ensure that your new roof will provide you with many years of protection and peace of mind.